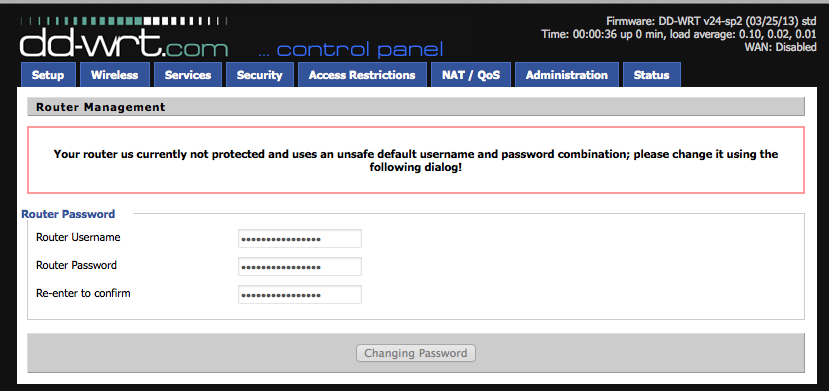
刷成功后先要设置用户名和密码,这个用户名和密码可以在 http://192.168.1.1中登录,如果是用 telnet 192.168.1.1 的话,用户名是root 密码和用web登录的密码是一样的。

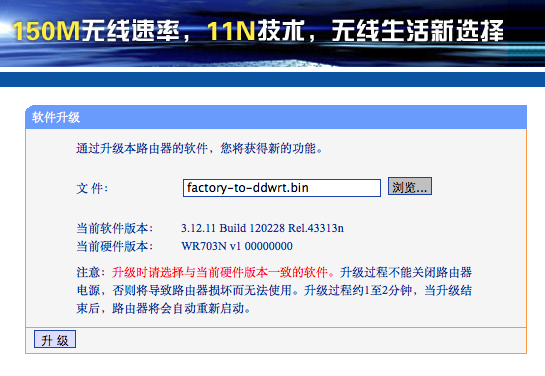
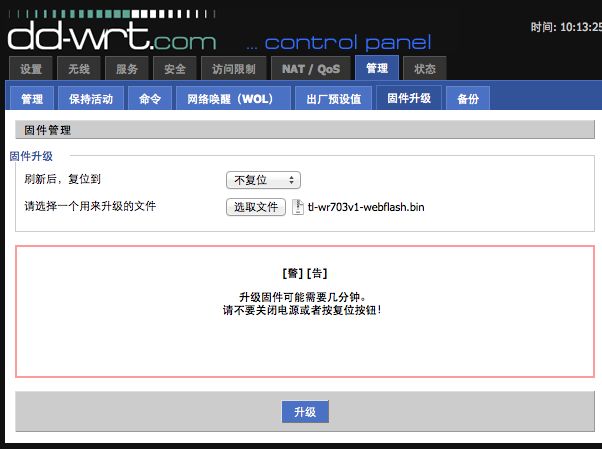
刷完就进入了ddwrt的界面,再继续刷tl-wr841nd-webflash.bin(Administration -> Firmware Upgrade)

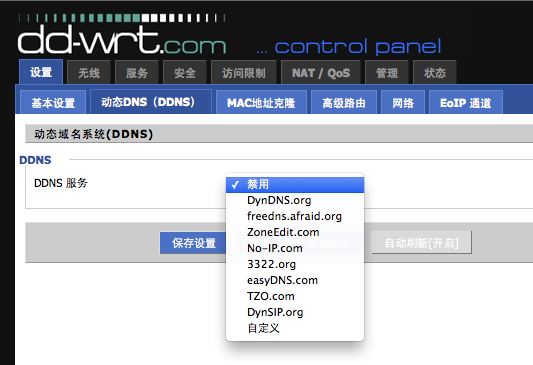
DD-WRT还支持蛮多动态域名的,没有内置支持花生壳,不过oray的官网有帮助文档教你怎么设置 《如何在ddwrt内核路由器中设置花生壳ddns 》

对dd-wrt下的动态域名和VPN服务器很有好感,以前觉得够用,可我实在搞不定dd-wrt下挂载U盘,搜索时发现许多人都是用openwrt安装U盘,openwrt似乎方便多了。于是决定换openwrt。
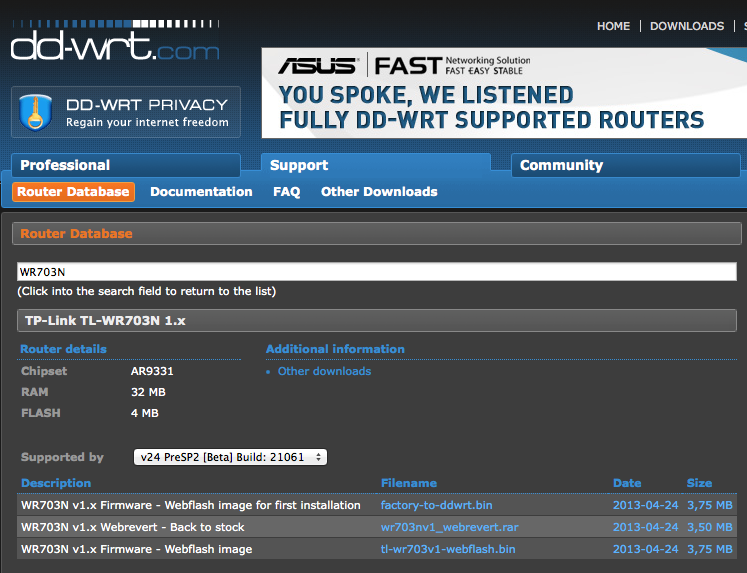
从安装过dd-wrt的TP -LINK WR703N(以下简称WR703N)上安装openwrt,我是按这里的教程操作的,居然成功了,大概方法是先去 http://downloads.openwrt.org/snapshots/trunk/ar71xx/ 里搜索 703,下载 http://downloads.openwrt.org/snapshots/trunk/ar71xx/openwrt-ar71xx-generic-tl-wr703n-v1-squashfs-factory.bin 由于没有联接互联网,所以放到自己电脑上,然后从WR703N里下载到/tmp 目录里,然后执行
mtd -r write openwrt-ar71xx-generic-tl-wr703n-v1-squashfs-factory.bin linux
就成功了。
gongzuola:~ zola$ telnet 192.168.1.1
Trying 192.168.1.1…
Connected to 192.168.1.1.
Escape character is ‘^]’.
DD-WRT v24-sp2 std (c) 2013 NewMedia-NET GmbH
Release: 03/25/13 (SVN revision: 21061)
download.zuola.com login: root
Password:
==========================================================
____ ___ __ ______ _____ ____ _ _
| _ | _ / / _ _ _| __ _|___ | || |
|| | || ||____ / / /| |_) || | / / __) | || |_
||_| ||_||_____ V V / | _ < | | V / / __/|__ _|
|___/|___/ _/_/ |_| _|_| _/ |_____| |_|
DD-WRT v24-sp2
http://www.dd-wrt.com
==========================================================
BusyBox v1.21.0 (2013-03-25 09:31:26 CET) built-in shell (ash)
Enter ‘help’ for a list of built-in commands.
root@download:~# ls
root@download:~# pwd
/tmp/root
root@download:~# wget http://192.168.1.100/uploads/openwrt-ar71xx-generic-tl-wr703n-v1-squashfs-factory.bin
Connecting to 192.168.1.100 (192.168.1.100:80)
openwrt-ar71xx-gener 100% |*******************************************************************************| 3840k 0:00:00 ETA
root@download:~# ls -la
drwx—— 3 root root 0 Jan 1 02:26 .
drwxrwxrwx 11 root root 0 Jan 1 02:08 ..
drwx—— 2 root root 0 Jan 1 00:00 .ssh
-rw-r–r– 1 root root 3932160 Jan 1 02:26 openwrt-ar71xx-generic-tl-wr703n-v1-squashfs-factory.bin
root@download:~# mtd -r write openwrt-ar71xx-generic-tl-wr703n-v1-squashfs-factory.bin linux
Unlocking linux …
Writing from openwrt-ar71xx-generic-tl-wr703n-v1-squashfs-factory.bin to linux … [w]
root@download:~# Connection closed by foreign host.
gongzuola:~ zola$ telnet 192.168.1.1
Trying 192.168.1.1…
Connected to 192.168.1.1.
Escape character is ‘^]’.
=== IMPORTANT ============================
Use ‘passwd’ to set your login password
this will disable telnet and enable SSH
——————————————
BusyBox v1.19.4 (2014-02-04 10:07:14 EST) built-in shell (ash)
Enter ‘help’ for a list of built-in commands.
_______ ________ __
| |.—–.—–.—–.| | | |.—-.| |_
| – || _ | -__| || | | || _|| _|
|_______|| __|_____|__|__||________||__| |____|
|__| W I R E L E S S F R E E D O M
—————————————————–
BARRIER BREAKER (Bleeding Edge, r39455)
—————————————————–
* 1/2 oz Galliano Pour all ingredients into
* 4 oz cold Coffee an irish coffee mug filled
* 1 1/2 oz Dark Rum with crushed ice. Stir.
* 2 tsp. Creme de Cacao
—————————————————–
root@OpenWrt:/# pwd
/
root@OpenWrt:/#
先看下CPU
root@OpenWrt:/# cat /proc/cpuinfo
system type : Atheros AR9330 rev 1
machine : TP-LINK TL-WR703N v1
processor : 0
cpu model : MIPS 24Kc V7.4
BogoMIPS : 265.42
wait instruction : yes
microsecond timers : yes
tlb_entries : 16
extra interrupt vector : yes
hardware watchpoint : yes, count: 4, address/irw mask: [0x0000, 0x0ff8, 0x0ff8, 0x0ff8]
isa : mips1 mips2 mips32r1 mips32r2
ASEs implemented : mips16
shadow register sets : 1
kscratch registers : 0
core : 0
VCED exceptions : not available
VCEI exceptions : not available
先修改密码
root@OpenWrt:/# passwd
Changing password for root
New password:
Retype password:
Password for root changed by root
默认openwrt里的WIFI是关闭的,去/etc/config/wireless里把禁用WIFI的语句删除掉,或者用#号注释掉这一行,这样就可以启用WIFI了,option ssid是改路由器的名字,我改成我的域名,不浪费向WIFI周围的人发广告的机会:)
root@OpenWrt:/# vi /etc/config/wireless
config wifi-device radio0
option type mac80211
option channel 11
option hwmode 11ng
option path ‘platform/ar933x_wmac’
option htmode HT20
list ht_capab SHORT-GI-20
list ht_capab SHORT-GI-40
list ht_capab RX-STBC1
list ht_capab DSSS_CCK-40
# REMOVE THIS LINE TO ENABLE WIFI:
#option disabled 1
config wifi-iface
option device radio0
option network lan
option mode ap
option ssid zuola.com
option encryption none
~
然后用VI修改网络接入(可能有人路过此文,补充介绍一下,vi这个编辑器里切换编辑模式是按a或esc,退出vi这个编辑器的方法是按esc然后输入:wq 这三个字母就可以保存并退出),我用的是把WR703N 接在另一个路由器上,另一个路由器的网段是192.168.2.0/24,网关是192.168.2.1 ,编辑成功后用reboot命令重启。然后就可以用root的密码通过SSH登录
BusyBox v1.19.4 (2014-02-04 10:07:14 EST) built-in shell (ash)
Enter ‘help’ for a list of built-in commands.
_______ ________ __
| |.—–.—–.—–.| | | |.—-.| |_
| – || _ | -__| || | | || _|| _|
|_______|| __|_____|__|__||________||__| |____|
|__| W I R E L E S S F R E E D O M
—————————————————–
BARRIER BREAKER (Bleeding Edge, r39455)
—————————————————–
* 1/2 oz Galliano Pour all ingredients into
* 4 oz cold Coffee an irish coffee mug filled
* 1 1/2 oz Dark Rum with crushed ice. Stir.
* 2 tsp. Creme de Cacao
—————————————————–
root@OpenWrt:# vi /etc/config/network
config interface ‘loopback’
option ifname ‘lo’
option proto ‘static’
option ipaddr ‘127.0.0.1’
option netmask ‘255.0.0.0’
config globals ‘globals’
option ula_prefix ‘fdee:b8d8:7905::/48’
config interface ‘lan’
option ifname ‘eth0’
option type ‘bridge’
option proto ‘static’
option ipaddr ‘192.168.2.11’
option netmask ‘255.255.255.0’
option ip6assign ’60’
option gateway ‘192.168.2.1’
option dns ‘8.8.8.8’
root@OpenWrt:/# reboot
Ping一下外网IP看网络通不通
root@OpenWrt:/# ping 8.8.8.8
PING 8.8.8.8 (8.8.8.8): 56 data bytes
64 bytes from 8.8.8.8: seq=0 ttl=47 time=21.938 ms
64 bytes from 8.8.8.8: seq=1 ttl=47 time=19.094 ms
^C
— 8.8.8.8 ping statistics —
2 packets transmitted, 2 packets received, 0% packet loss
round-trip min/avg/max = 19.094/20.516/21.938 ms
root@OpenWrt:/#
WR703N可以上网了,这下就可以安装好多好多openwrt的模块了。
每次重启WR703N后都先要opkg update一下才能安装模块,不update一下什么都安装不到,好像是先下载一个列表到路由器里,然后就有很多模块可以安装了。
root@OpenWrt:/# opkg update
Downloading http://downloads.openwrt.org/snapshots/trunk/ar71xx/packages/Packages.gz.
Updated list of available packages in /var/opkg-lists/barrier_breaker.
root@OpenWrt:/#
做个备份措施先:
root@OpenWrt:/# opkg install restorefactory
以后重置时能节约很多时间,减少痛苦。
我要安装支持U盘挂载的模块
root@OpenWrt:/# opkg install kmod-usb-storage block-mount
Installing kmod-usb-storage (3.10.28-1) to root…
Downloading http://downloads.openwrt.org/snapshots/trunk/ar71xx/packages/kmod-usb-storage_3.10.28-1_ar71xx.ipk.
Installing kmod-scsi-core (3.10.28-1) to root…
Downloading http://downloads.openwrt.org/snapshots/trunk/ar71xx/packages/kmod-scsi-core_3.10.28-1_ar71xx.ipk.
Installing block-mount (2014-01-29-71ea854364833c5dcb0800e092b45fed2c45910e) to root…
Downloading http://downloads.openwrt.org/snapshots/trunk/ar71xx/packages/block-mount_2014-01-29-71ea854364833c5dcb0800e092b45fed2c45910e_ar71xx.ipk.
Configuring kmod-scsi-core.
kmod: failed to insert /lib/modules/3.10.28/sd_mod.ko
Configuring kmod-usb-storage.
Configuring block-mount.
root@OpenWrt:/# reboot
输入
root@OpenWrt:~# dmesg
能在长长地输出结果里找到2.00 GB/1.86 GiB的字样,证明能识别到我的U盘了
[ 7.080000] scsi 0:0:0:0: Direct-Access Generic Flash Disk 8.07 PQ: 0 ANSI: 2
[ 7.090000] sd 0:0:0:0: [sda] 3911680 512-byte logical blocks: (2.00 GB/1.86 GiB)
[ 7.100000] sd 0:0:0:0: [sda] Write Protect is off
[ 7.100000] sd 0:0:0:0: [sda] Mode Sense: 03 00 00 00
[ 7.100000] sd 0:0:0:0: [sda] No Caching mode page found
[ 7.110000] sd 0:0:0:0: [sda] Assuming drive cache: write through
[ 7.120000] sd 0:0:0:0: [sda] No Caching mode page found
[ 7.120000] sd 0:0:0:0: [sda] Assuming drive cache: write through
多次尝试挂载已经格式化为ext3的USB disk不成功
root@OpenWrt:# mkdir /mnt/usb
root@OpenWrt:# mount /dev/sda1 /mnt/usb
mount: mounting /dev/sda1 on /mnt/usb failed: Invalid argument
或
root@OpenWrt:# mount -t ext3 /dev/sda1 /mnt/usb
mount: mounting /dev/sda1 on /mnt/usb failed: No such device
都不成功。
实在搞不定,安装一个fdisk试试
root@OpenWrt:# opkg install fdisk
Installing fdisk (2.21.2-2) to root…
Downloading http://downloads.openwrt.org/snapshots/trunk/ar71xx/packages/fdisk_2.21.2-2_ar71xx.ipk.
Installing libblkid (2.21.2-2) to root…
Downloading http://downloads.openwrt.org/snapshots/trunk/ar71xx/packages/libblkid_2.21.2-2_ar71xx.ipk.
Installing libuuid (2.21.2-2) to root…
Downloading http://downloads.openwrt.org/snapshots/trunk/ar71xx/packages/libuuid_2.21.2-2_ar71xx.ipk.
Configuring libuuid.
Configuring libblkid.
Configuring fdisk.
root@OpenWrt:#
然后用fdisk -l查看一下
root@OpenWrt:# fdisk -l
Disk /dev/mtdblock0: 0 MB, 131072 bytes
255 heads, 63 sectors/track, 0 cylinders, total 256 sectors
Units = sectors of 1 * 512 = 512 bytes
Sector size (logical/physical): 512 bytes / 512 bytes
I/O size (minimum/optimal): 512 bytes / 512 bytes
Disk /dev/mtdblock1: 1 MB, 1068032 bytes
255 heads, 63 sectors/track, 0 cylinders, total 2086 sectors
Units = sectors of 1 * 512 = 512 bytes
Sector size (logical/physical): 512 bytes / 512 bytes
I/O size (minimum/optimal): 512 bytes / 512 bytes
Disk /dev/mtdblock2: 2 MB, 2929152 bytes
255 heads, 63 sectors/track, 0 cylinders, total 5721 sectors
Units = sectors of 1 * 512 = 512 bytes
Sector size (logical/physical): 512 bytes / 512 bytes
I/O size (minimum/optimal): 512 bytes / 512 bytes
Disk /dev/mtdblock3: 1 MB, 1048576 bytes
255 heads, 63 sectors/track, 0 cylinders, total 2048 sectors
Units = sectors of 1 * 512 = 512 bytes
Sector size (logical/physical): 512 bytes / 512 bytes
I/O size (minimum/optimal): 512 bytes / 512 bytes
Disk /dev/mtdblock4: 0 MB, 65536 bytes
255 heads, 63 sectors/track, 0 cylinders, total 128 sectors
Units = sectors of 1 * 512 = 512 bytes
Sector size (logical/physical): 512 bytes / 512 bytes
I/O size (minimum/optimal): 512 bytes / 512 bytes
Disk /dev/mtdblock5: 3 MB, 3997696 bytes
255 heads, 63 sectors/track, 0 cylinders, total 7808 sectors
Units = sectors of 1 * 512 = 512 bytes
Sector size (logical/physical): 512 bytes / 512 bytes
I/O size (minimum/optimal): 512 bytes / 512 bytes
Disk /dev/sda: 2002 MB, 2002780160 bytes
255 heads, 63 sectors/track, 243 cylinders, total 3911680 sectors
Units = sectors of 1 * 512 = 512 bytes
Sector size (logical/physical): 512 bytes / 512 bytes
I/O size (minimum/optimal): 512 bytes / 512 bytes
Disk identifier: 0xad400762
Device Boot Start End Blocks Id System
/dev/sda1 * 63 3903794 1951866 83 Linux
root@OpenWrt:#
U盘是 /dev/sda ,2002M, U盘上的第一个分区是/dev/sda1 没错呀,再试一次
root@OpenWrt:/mnt/usb# mount /dev/sda1 /mnt/usb
mount: mounting /dev/sda on /mnt/usb failed: Invalid argument
还是不成功,kmod-fs-ext3找不着,再安装一个kmod-fs-ext4试试,
root@OpenWrt:# opkg install kmod-fs-ext4
Installing kmod-fs-ext4 (3.10.28-1) to root…
Downloading http://downloads.openwrt.org/snapshots/trunk/ar71xx/packages/kmod-fs-ext4_3.10.28-1_ar71xx.ipk.
Installing kmod-lib-crc16 (3.10.28-1) to root…
Downloading http://downloads.openwrt.org/snapshots/trunk/ar71xx/packages/kmod-lib-crc16_3.10.28-1_ar71xx.ipk.
Installing kmod-crypto-hash (3.10.28-1) to root…
Downloading http://downloads.openwrt.org/snapshots/trunk/ar71xx/packages/kmod-crypto-hash_3.10.28-1_ar71xx.ipk.
Configuring kmod-crypto-hash.
Configuring kmod-lib-crc16.
Configuring kmod-fs-ext4.
kmod: failed to insert /lib/modules/3.10.28/ext4.ko
root@OpenWrt:#
安装blkid,用来找出U盘的UUID ,我的U盘的UUID是 bb61c6b9-2c3b-3e43-283e-053741e4cc99
root@OpenWrt:# opkg install blkid
Installing blkid (2.21.2-2) to root…
Downloading http://downloads.openwrt.org/snapshots/trunk/ar71xx/packages/blkid_2.21.2-2_ar71xx.ipk.
Configuring blkid.
root@OpenWrt:/# blkid
/dev/mtdblock2: TYPE=”squashfs”
/dev/sda1: LABEL=”test” UUID=”bb61c6b9-2c3b-3e43-283e-053741e4cc99″ SEC_TYPE=”ext2″ TYPE=”ext3″
root@OpenWrt:/#
成功mount后,可以修改/etc/config/fstab,使得启动时自动mount USB。居然自动写入UUID了,我没写进去过啊。
root@OpenWrt:/# vi /etc/config/fstab
config ‘global’
option anon_swap ‘0’
option anon_mount ‘0’
option auto_swap ‘1’
option auto_mount ‘1’
option delay_root ‘5’
option check_fs ‘0’
config ‘mount’
option target ‘/mnt/sda1’
option uuid ‘bb61c6b9-2c3b-3e43-283e-053741e4cc99’
option enabled ‘0’
上面我什么都没修改,对比别人的内容后发现 option enabled ‘1’是0,那我改为1试试
option enabled ‘1’
重启后再挂载一次
root@OpenWrt:~# mount /dev/sda1 /mnt/usb
root@OpenWrt:~#
耶,他妈的,总算成功了。
下载一个1G的文件进去试试
root@OpenWrt:/mnt/usb/lost+found# wget “http://192.168.2.5/hightechlowlife.mp4”
Connecting to 192.168.2.5 (192.168.2.5:80)
hightechlowlife.mp4 73% |****************************** | 849M 0:03:36 ETA
WR703N的内存只有32M,能下载849M进去,这证明确实安装U盘成功了。
再用df -h 确认一下
root@OpenWrt:/mnt/usb/lost+found# df -h
Filesystem Size Used Available Use% Mounted on
rootfs 1.0M 708.0K 316.0K 69% /
/dev/root 1.8M 1.8M 0 100% /rom
tmpfs 14.1M 56.0K 14.1M 0% /tmp
/dev/mtdblock3 1.0M 708.0K 316.0K 69% /overlay
overlayfs:/overlay 1.0M 708.0K 316.0K 69% /
tmpfs 512.0K 0 512.0K 0% /dev
/dev/sda1 1.8G 1.1G 567.6M 67% /mnt/sda1
/dev/sda1 1.8G 1.1G 567.6M 67% /mnt/usb
root@OpenWrt:/mnt/usb/lost+found#
再次修改/etc/config/fstab 启用随机启动
root@OpenWrt:/mnt/usb# vi /etc/config/fstab
config ‘global’
option anon_swap ‘0’
option anon_mount ‘0’
option auto_swap ‘1’
option auto_mount ‘1’
option delay_root ‘5’
option check_fs ‘0’
config ‘mount’
option uuid ‘bb61c6b9-2c3b-3e43-283e-053741e4cc99’
option target /mnt/usb
option device /dev/sda1
option fstype ext3
option options rw,sync
option enabled 1
option enabled_fsck 0
~
root@OpenWrt:/mnt/usb# /etc/init.d/fstab enable
root@OpenWrt:/mnt/usb# /etc/init.d/fstab start
输入reboot重启一下再看一下
root@OpenWrt:/# ls /mnt/usb/lost+found
hightechlowlife.mp4
root@OpenWrt:/#
好了,自动挂载U盘成功了
查看已经安装的模块
root@OpenWrt:/# opkg list-installed
查看可用的模块
root@OpenWrt:/# opkg list
之前安装的 fdisk blkid都可以卸载掉,反正没用上,WR703N的内存有限
root@OpenWrt:/# opkg remove fdisk
Removing package fdisk from root…
root@OpenWrt:/# opkg remove blkid
Removing package blkid from root…
root@OpenWrt:/#
接下来,要想办法让外网的人能下载到hightechlowlife.mp4 这个文件.安装一个nginx
root@OpenWrt:/# opkg install nginx
Installing nginx (1.4.4-1) to root…
Downloading http://downloads.openwrt.org/snapshots/trunk/ar71xx/packages/nginx_1.4.4-1_ar71xx.ipk.
Installing libpcre (8.11-2) to root…
Downloading http://downloads.openwrt.org/snapshots/trunk/ar71xx/packages/libpcre_8.11-2_ar71xx.ipk.
Installing libopenssl (1.0.1e-2) to root…
Configuring libpcre.
Collected errors:
* verify_pkg_installable: Only have 520kb available on filesystem /overlay, pkg libopenssl needs 663
* opkg_install_cmd: Cannot install package nginx.
root@OpenWrt:/#
/overlay的空间不够用,怎么办呢?想办法挂载U盘分区到/overlay 应该能扩容
root@OpenWrt:/etc/config# vi fstab
config ‘global’
option anon_swap ‘0’
option anon_mount ‘0’
option auto_swap ‘1’
option auto_mount ‘1’
option delay_root ‘5’
option check_fs ‘0’
config ‘mount’
option uuid ‘bb61c6b9-2c3b-3e43-283e-053741e4cc99’
option target /overlay
#option target /mnt/usb
option device /dev/sda1
option fstype ext3
option options rw,sync
option enabled 1
option enabled_fsck 0
格式化U盘为ext4,先安装e2fsprogs
root@OpenWrt:/# opkg update
Downloading http://downloads.openwrt.org/snapshots/trunk/ar71xx/packages/Packages.gz.
Updated list of available packages in /var/opkg-lists/barrier_breaker.
root@OpenWrt:/mnt# opkg install e2fsprogs
Installing e2fsprogs (1.42.4-1) to root…
Downloading http://downloads.openwrt.org/snapshots/trunk/ar71xx/packages/e2fsprogs_1.42.4-1_ar71xx.ipk.
Installing libuuid (2.21.2-2) to root…
Downloading http://downloads.openwrt.org/snapshots/trunk/ar71xx/packages/libuuid_2.21.2-2_ar71xx.ipk.
Installing libext2fs (1.42.4-1) to root…
Downloading http://downloads.openwrt.org/snapshots/trunk/ar71xx/packages/libext2fs_1.42.4-1_ar71xx.ipk.
Configuring libuuid.
Configuring libext2fs.
Configuring e2fsprogs.
root@OpenWrt:/#
经常遇到内存不够导致无法安装新软件,甚至无法修改/etc/config/fstab,无法保存修改后的文件。只好拿发夹按住 WR703N的reset置为ddwrt的初始设置。幸亏我之前做过
root@OpenWrt:/# opkg install restorefactory
恢复后
telnet 192.169.1.1
vi /etc/config/network 把网络修改为能上网的地址。
reboot
安装以下模块
opkg update
opkg install kmod-usb-storage block-mount kmod-fs-ext4
安装分区要用的
opkg install fdisk e2fsprogs
开始分区
fdisk /dev/sda
分三个区,激活第一个分区为可引导。如何分构我就不介绍了,进入fdisk按m看菜单,按n再按p建议主分区,建三个主分区就好,还要按a把第一个分区激活为活动分区,这样才能从U老盘引导操作系统。
mkfs.ext4 /dev/sda1
将第一个分区格式化为ext4格式
mkswap /dev/sda2
将第二个分区格式化为swap交换分区
mkfs.ext4 /dev/sda3
将第三个分区格式化为ext4格式
reboot
root@OpenWrt:# mkfs.ext4 /dev/sda1
mke2fs 1.42.4 (12-June-2012)
Filesystem label=
OS type: Linux
Block size=4096 (log=2)
Fragment size=4096 (log=2)
Stride=0 blocks, Stripe width=0 blocks
122160 inodes, 487966 blocks
24398 blocks (5.00%) reserved for the super user
First data block=0
Maximum filesystem blocks=503316480
15 block groups
32768 blocks per group, 32768 fragments per group
8144 inodes per group
Superblock backups stored on blocks:
32768, 98304, 163840, 229376, 294912
Allocating group tables: done
Writing inode tables: done
Creating journal (8192 blocks): done
Writing superblocks and filesystem accounting information: done
最后的fstab是下面这样的,大部分内容是fstab自已生成的,应该是block-mount的功劳:
root@OpenWrt:/# cat /etc/config/fstab
config ‘global’
option anon_swap ‘0’
option anon_mount ‘0’
option auto_swap ‘1’
option auto_mount ‘1’
option delay_root ‘5’
option check_fs ‘0’
config ‘mount’
option target ‘/overlay’
option uuid ‘3499043d-7858-463f-97a4-e03610026dc7’
option enabled ‘1’
option enabled_fsck 0
config ‘swap’
option device ‘/dev/sda2’
option enabled ‘1’
config ‘mount’
option target ‘/mnt’
option uuid ‘b6fc0ecf-17d6-48ec-9b33-5ea0f0a20064’
option enabled ‘1’
root@OpenWrt:/#
复制文件到U盘
root@OpenWrt:/# mount /dev/sda1 /mnt
root@OpenWrt:/# mkdir /tmp/root
root@OpenWrt:/# mount -o bind / /tmp/root
root@OpenWrt:/# cp /tmp/root/* /mnt -a
root@OpenWrt:/# umount /tmp/root
编辑U盘里的在banner里加入文字用于识别当前操作系统从哪引导的,我加入了boot from usb字样
root@OpenWrt:/#vi /mnt/etc/banner
root@OpenWrt:/# umount /mnt
root@OpenWrt:/reboot
重启一次,终于出现boot from usb了
gongzuola:~ zola$ telnet 192.168.2.8
Trying 192.168.2.8…
Connected to 192.168.2.8.
Escape character is ‘^]’.
=== IMPORTANT ============================
Use ‘passwd’ to set your login password
this will disable telnet and enable SSH
——————————————
BusyBox v1.19.4 (2014-02-04 10:07:14 EST) built-in shell (ash)
Enter ‘help’ for a list of built-in commands.
_______ ________ __
| |.—–.—–.—–.| | | |.—-.| |_
| – || _ | -__| || | | || _|| _|
|_______|| __|_____|__|__||________||__| |____|
|__| W I R E L E S S F R E E D O M
—————————————————–
BARRIER BREAKER (Bleeding Edge, r39455)
—————————————————–
* 1/2 oz Galliano Pour all ingredients into
* 4 oz cold Coffee an irish coffee mug filled
* 1 1/2 oz Dark Rum with crushed ice. Stir.
* 2 tsp. Creme de Cacao
—————————————————–
Boot from USB now.
root@OpenWrt:/# passwd
overlay目录终于有19.3M了
root@OpenWrt:/# df -h
Filesystem Size Used Available Use% Mounted on
rootfs 19.3M 6.7M 11.2M 37% /
/dev/root 1.8M 1.8M 0 100% /rom
tmpfs 14.1M 52.0K 14.1M 0% /tmp
/dev/sda1 19.3M 6.7M 11.2M 37% /overlay
overlayfs:/overlay 19.3M 6.7M 11.2M 37% /
tmpfs 512.0K 0 512.0K 0% /dev
/dev/sda3 1.7G 2.7M 1.6G 0% /mnt
这下随便我安装东西了。我去 /etc/banner里改一下,放一只ascii的狗。
BusyBox v1.19.4 (2014-02-04 10:07:14 EST) built-in shell (ash)
Enter ‘help’ for a list of built-in commands.
__ _,–=”=–,_ __
/ .” .-. “./
/ ,/ _ : : _ /`
`| /o :_: /o |__/
`-‘| :=”~` _ `~”=: |
` (_) `/
.-“-. | / .-“-.
.—{ }–| /,.-‘-., |–{ }—.
) (_)_)_) _/`~-===-~`_/ (_(_(_) (
—————————————————–
Openwrt Boot from USB now.
root@OpenWrt:~#
可以安装openvpn客户端。
root@OpenWrt:~# opkg install openvpn-openssl
可以安装chnroutes,用来自动翻墙
安装 chnroutes https://code.google.com/p/chnroutes/
我先不折腾这些,我安装一个web控制界面试试
第三个目标:继续折腾动态域名,我要使用花生壳
参考 http://wiki.openwrt.org/doc/howto/ddns.client (这个网站不支持中文的safari浏览器,要换别的浏览器才能打开)
root@OpenWrt:# opkg install ddns-scripts
Installing ddns-scripts (1.0.0-22) to root…
Downloading http://downloads.openwrt.org/snapshots/trunk/ar71xx/packages/ddns-scripts_1.0.0-22_all.ipk.
Configuring ddns-scripts.
root@OpenWrt:# vi /etc/config/ddns
config service “myddns”
option enabled “1”
option interface “wan”
option use_syslog “1”
option service_name “ddns.oray.com”
option domain “fengmuqiao.gicp.net”
option username “fengmuqiao”
option password “fuckgfw”
option use_https “0”
option force_interval “72”
option force_unit “hours”
option check_interval “10”
option check_unit “minutes”
option retry_interval “60”
option retry_unit “seconds”
#option ip_source “network”
#option ip_network “wan”
#option ip_source “interface”
#option ip_interface “eth0.1”
#option ip_source “script”
#option ip_script “path to your scrip”
option ip_source “web”
option ip_url “http://checkip.dyndns.com/”
option update_url http://[USERNAME]:[PASSWORD]@ddns.oray.com/ph/update?hostname=[DOMAIN]&myip=[IP]
~
~
验证一下:
root@OpenWrt:/# ps | grep dynamic_dns_updater.sh
6676 root 1472 S grep dynamic_dns_updater.sh
root@OpenWrt:/#
然后再看看IP会不会更新:
root@OpenWrt:/etc/config# /usr/lib/ddns/dynamic_dns_updater.sh myddns
update_url=http://[USERNAME]:[PASSWORD]@ddns.oray.com/ph/update?hostname=[DOMAIN]&myip=[IP]
force seconds = 259200
check seconds = 600
old process id (if it exists) = “”
time_since_update = 0 hours
Running IP check…
current system ip = 36.225.79.129
registered domain ip = 36.225.79.139
update necessary, performing update …
updating with url=”http://fengmuqiao:
[email protected]/ph/update?hostname=fengmuqiao.gicp.net&myip=36.225.79.129″
Connecting to ddns.oray.com (202.105.21.204:80)
– 100% |***************************************************************| 18 0:00:00 ETA
Update Output:
good 36.225.79.129
update complete, time is: Tue Feb 11 11:30:09 UTC 2014
动态域名成功了
然后我去把freewifi.zuola.com 的cname指向 fengmuqiao.gicp.net 就好了。
第四个目标:安装FTP服务器
root@OpenWrt:~# opkg update
root@OpenWrt:~# opkg install vsftpd
root@OpenWrt:/# /etc/init.d/vsftpd start
root@OpenWrt:/# /etc/init.d/vsftpd enable
把匿名FTP共享设置到/mnt/usbdisk上去,方便人家登录后就可以用FTP下载
先改ftp这个匿名用户的主目录,去passwd里找:
root@OpenWrt:/# vi /etc/passwd
把/home/ftp改为/mnt/usbdisk,
ftp:*:55:55:ftp:/mnt/usbdisk:/bin/false
这样修改还不够,FTP登录会出现错误,提示:vsftpd: refusing to run with writable root inside chroot()
据说是为了避免一个安全漏洞,从 vsftpd 2.3.5 开始,chroot 目录必须不可写,解决办法:
root@OpenWrt:/# chmod 555 /mnt/usbdisk
这样就解决了
把配置文件里的anonymous_enable改为YES
root@OpenWrt:/# vi /etc/vsftpd.conf
配置文件如下:
background=YES
listen=YES
anonymous_enable=YES
#local_enable=YES
write_enable=NO
local_umask=022
check_shell=NO
dirmessage_enable=YES
ftpd_banner=Welcome to High Tech Low Life FTP service.
session_support=NO
syslog_enable=YES
#userlist_enable=YES
#userlist_deny=NO
#userlist_file=/etc/vsftpd.users
#xferlog_enable=YES
#xferlog_file=/var/log/vsftpd.log
#xferlog_std_format=YES
max_per_ip=2
重启FTP
root@OpenWrt:/# /etc/init.d/vsftpd restart
搞定匿名FTP
第五个目标:网上邻居的网络共享
root@OpenWrt:# opkg install samba36-server
root@OpenWrt:# opkg install luci-app-samba
root@OpenWrt:# vi /etc/config/samba
luci-app-samba是在luci web控制面板里增加管理网络共享的插件
/etc/init.d/samba start
去修改smb.conf.template,把security=user改为security=share,这样就不需要密码就可以登录网络共享了
root@OpenWrt:/# vi /etc/samba/smb.conf.template
security = share
还要修改samba配置文件
root@OpenWrt:/# vi /etc/config/samba
config samba
option name ‘NAS’
option workgroup ‘WORKGROUP’
option description ‘Network-attached storage’
option homes ‘1’
config sambashare
option name ‘nas_disk’
option path ‘/mnt/usbdisk’
option guest_ok ‘yes’
option users ‘ftp’
option read_only ‘yes’
option ‘only_guest’ ‘yes’
option ‘guest_ok’ ‘yes’
~
openwrt里有root和nobody这两个内置用户名,安装vsftpd后会有FTP这个用户名。如果想添加就用 smbpasswd这个命令来添加
root@OpenWrt:/# smbpasswd -a zola
然后启用
root@OpenWrt:/# /etc/init.d/samba enable
root@OpenWrt:/# /etc/init.d/samba start
网络共享就完成了,以后windows电脑用
//192.168.2.8
苹果电脑用
smb://192.168.2.1
就可以匿名登录这个只读的共享文件夹了。如果想改为可读写的,那就把前面提到的 把security=share改为security=user吧,然后慢慢找设置读写的地方吧。
第六个目标:安装BT客户端
root@OpenWrt:~# opkg install transmission transmission-daemon
去vi /etc/config/transmission 把enable改为1
然后可以下载一个GUI来控制BT下载
要是openwrt支持bittorrent sync就好了.
成功下载到BT文件,只是不知道怎么继续做种。我想拿这个WR703N做种啊。
查看openwrt的系统日志的命令是 logread
看UTC时间很不爽
root@OpenWrt:# date
Tue Feb 11 13:39:25 UTC 2014
去/etc/TZ这个文章里把UTC改为东八区CST-8,
root@OpenWrt:# vi /etc/TZ
CST-8
搞定
root@OpenWrt:# date
Tue Feb 11 21:47:00 CST 2014
未完,继续折腾,继续做笔记。


受益良多! 謝謝你!
写得很详细,谢谢
我想折腾路由器主要的原因只有一个:使用Shadowsocks。在VPS上部署的Openswan速度太慢。想想还是折腾树莓派吧
你好,我照着上文的方法把我的路由器挂载到U盘启动后,电脑可以通过无线路由器上网,但是手机连接到wifi后不能获取到ip地址,怎么办呀